Dynamic credentials for Google Cloud Platform
Having total 16+ years of experience, 10+ as a Java/J2EE Server Side Backend Developer, 6+ years on Cloud(AWS/GCP).
Vault & Dynamic Secrets
HashiCorp Vault is a tool that enables you to keep your secrets secured and encrypted. It can also do other things like encrypt data for your applications (so they don’t need a special library to do so) and generate temporary secrets and certificates for users and services.
All requests to Vault are done via an API and need a token — this token can be generated in multiple ways via different authentication methods such as OIDC, LDAP, username and password, etc.
Vault is also extensible, with many different secret stores and authentication mechanisms added regularly for various cases.
Overall, Vault is possibly the most comprehensive tool for secret management available today and it can be a powerful asset to an organisation that has complex and dynamic requirements for secret management.
Vault allows dynamically generated users and passwords for databases or other tools like SSH. This is a feature that’s enormously beneficial to contain the sprawl of users and passwords around your organisation and to keep track of who, when and what a user is doing.
Most importantly, it also protects you from leaked credentials causing damage to your organisation as the generated secrets can be configured to last however long you define. Dynamic secrets do not exist until they are read, so there is no risk of someone stealing them or another client using the same secrets. Because Vault has built-in revocation mechanisms, dynamic secrets can be revoked immediately after use, minimizing the amount of time the secret existed.
Dynamic secrets are a core feature in Vault. In this blog, we will see how we can leverage vault dynamic secrets functionality with Google Cloud Platform. To consume Google Cloud Platform (GCP) services (e.g. GCP Kubernetes service), the client must have valid GCP credentials. GCP uses service accounts to authenticate services running in GCP with other GCP services. For example, a compute engine virtual machine (VM) requires credentials to authenticate with other GCP services. We will configure GCP to support Vault and setup Vault to generate either a OAuth token or service account key.
Personas
The end-to-end scenario described in this blog involves two personas:
adminwith privileged permissions to configure Vault secrets engines and GCP resourcesappsread the secrets from Vault
Prerequisites
This blog assumes the following:
You have a Google Cloud Platform account with permission to:
Create IAM service accounts, policies
Enable GCP APIs
Access the GCP Cloud Shell
Create VMs
Vault installed on your local machine
jq installed
Workstation setup
- Create a temporary directory to store the files used for this tutorial.
$ mkdir ~/TUTORIAL_TEMP
2. Retrieve the directory path and store it in the TUTORIAL_TEMP environment variable.
$ TUTORIAL_TEMP=$(echo ~/TUTORIAL_TEMP)
3. Go to the TUTORIAL_TEMP directory.
$ cd $TUTORIAL_TEMP
Vault setup
- Open a new terminal window and start a Vault dev server with
rootas the root token.
$ vault server -dev -dev-root-token-id root
The Vault dev server defaults to running at 127.0.0.1:8200. The server is initialized and unsealed.
2. Return to the terminal where you created the TUTORIAL_TEMP directory.
3. Export an environment variable for the vault CLI to address the Vault server.
$ export VAULT_ADDR=http://127.0.0.1:8200
4. Export an environment variable for the vault CLI to authenticate with the Vault server.
$ export VAULT_TOKEN=root
The Vault server is ready.
Configure GCP services for Vault
(Persona: admin)
Before Vault can manage dynamic credentials using the GCP secrets engine, you need to configure the necessary resources in GCP. This includes enabling the required GCP APIs, creating a IAM service account and IAM policy for Vault, and a creating key for the service account that Vault will use to authenticate with GCP.
Open a browser and sign into the GCP console.
Click the terminal icon to launch the GCP Cloud Shell. A new pane will open at the bottom of your window and provision a Cloud Shell instance.
In the Cloud Shell terminal, list the GCP project ID.
$ gcloud projects list

PROJECT_ID: abc-123defde860044c59e853ee2819
NAME: my-gcp-account-name
PROJECT_NUMBER: 85527753462
The project ID is used when configuring both GCP and Vault.
4. Verify the cloud resource manager and IAM API’s are enabled.
$ gcloud services list --enabled | grep 'resource\|iam'

NAME: cloudresourcemanager.googleapis.com
NAME: iam.googleapis.com
NAME: iamcredentials.googleapis.com
If cloudresourcemanager.googleapis.com and iam.googleapis.com are not listed, enable the API(s).
a) Enable the iam.googleapis.com API.
$ gcloud services enable iam.googleapis.com
b) Enable the cloudresourcemanager.googleapis.com API.
$ gcloud services enable cloudresourcemanager.googleapis.com
5. Create a service account for Vault to authenticate with GCP.
$ gcloud iam service-accounts create \
    VaultServiceAccount \
    --display-name="VaultServiceAccount"
6. Create a GCP IAM role for Vault and assign the required permissions.
$ gcloud iam roles create VaultServiceRole \
    --project=$DEVSHELL_PROJECT_ID \
    --title=VaultServiceRole \
    --stage=GA \
    --permissions=iam.serviceAccounts.create,iam.serviceAccounts.delete,iam.serviceAccounts.get,iam.serviceAccounts.list,iam.serviceAccounts.update,iam.serviceAccountKeys.create,iam.serviceAccountKeys.delete,iam.serviceAccountKeys.get,iam.serviceAccountKeys.list,iam.serviceAccounts.getAccessToken,resourcemanager.projects.getIamPolicy,resourcemanager.projects.setIamPolicy
7. Retrieve the role name and store it in the ROLE_NAME environment variable.
$ ROLE_NAME=$(gcloud iam roles list --project=$DEVSHELL_PROJECT_ID --format=json --filter="vault" | jq -r .[].name)
8. Retrieve the service account email and store it in the SERVICE_ACCOUNT environment variable.
$ SERVICE_ACCOUNT=$(gcloud iam service-accounts list --project=$DEVSHELL_PROJECT_ID --filter=vault --format=json | jq -r .[].email)
9. Add the Vault service account to the GCP project and bind the role to the service account.
$ gcloud projects add-iam-policy-binding $DEVSHELL_PROJECT_ID \
    --member="serviceAccount:$SERVICE_ACCOUNT" \
    --role="$ROLE_NAME"
10. Create a service account key credential file.
$ gcloud iam service-accounts keys create VaultServiceAccountKey.json \
    --iam-account=$SERVICE_ACCOUNT \
    --project=$DEVSHELL_PROJECT_ID
11. Click the More button (represented by the vertical ellipsis) and select Download.
12. Click the folder icon, expand the directory, select the VaultServiceAccountKey.json file, and click Download.
13. Store the VaultServiceAccountKey.json file in TUTORIAL_TEMP directory you created in the lab setup section.
14. Retrieve and copy the GCP project ID from the Cloud Shell terminal.
$ echo $DEVSHELL_PROJECT_ID
15. Return to the terminal where you set the TUTORIAL_TEMP environment variable and set the GCP_PROJECT_ID environment variable to the value from the previous step.
$ export GCP_PROJECT_ID=<actual-project-id>
You have completed the necessary configuration in GCP to support the Vault GCP secrets engine.
Configure Vault
(Persona: admin)
There are two types of credentials Vault can generate for GCP — a JSON formated service account key credential file, and an OAuth token. Each of these methods have benefits and contrstraints that need to be considered for your use case.
Service account keys have a limit of ten keys per service account. This limit can quickly be reached in large, or busy environments. Depending on the workload, this limitation can be managed by setting a low TTL that permits the workload to complete. Service keys, however, are supported across most clients and the lifetime of the key can be fully managed by Vault.
OAuth access tokens do not have any limits on the number of tokens that can be requested. This can be beneficial for large environments or when workloads have a long runtime because you will not reach the same limit as service account keys. OAuth tokens are not supported by all clients and Vault is not able to fully manage the token. All tokens have a default TTL of one hour and cannot be revoked by Vault.
- In the terminal where you set the
TUTORIAL_TEMPenvironment variable, enable the GCP secrets engine.
$ vault secrets enable gcp

Success! Enabled the gcp secrets engine at: gcp/
2. Configure the GCP secrets engine to use the VaultServiceAccountKey.json credentials.
$ vault write gcp/config \
    ttl="2m" \
    max_ttl="10m" \
    credentials=@$TUTORIAL_TEMP/VaultServiceAccountKey.json
3. Define the bindings to be used by Vault in a file named gcpbindings.hcl.
$ tee $TUTORIAL_TEMP/gcpbindings.hcl <<EOF
 resource "//cloudresourcemanager.googleapis.com/projects/$GCP_PROJECT_ID" {
        roles = ["roles/viewer"]
      }
EOF
4. Create a Vault roleset named edu-app-token.
$ vault write gcp/roleset/edu-app-token \
    project=$GCP_PROJECT_ID \
    secret_type="access_token"  \
    token_scopes="https://www.googleapis.com/auth/cloud-platform" \
    bindings=@$TUTORIAL_TEMP/gcpbindings.hcl
The Vault configuration is complete.
Request GCP credentials
(Persona: app)
oAuth Token
An application can read the Vault roleset to generate a unique OAuth token.
- Read the
edu-app-tokenroleset to generate a new token.
$ vault read gcp/roleset/edu-app-token/token

Key                   Value
---                   -----
expires_at_seconds    1677772328
token                 ya29.c.b0Aaekm1JDyWPbVqy...snip...ccVteJkpyvRBbYbWqli5Oz
token_ttl             59m58s
The token is generated with the default TTL of one hour (60 minutes). OAuth tokens are managed by GCP, and not visible in the GCP console.
2. Return to the GCP console.
3. Expand the hamburger menu and navigate to IAM & Admin >> Service Accounts.
4. A service account has been created in GCP based on the Vault role name edu-app-token.
5. Click the vaultedu-app-token123456789@… service account and click the KEYS tab.
6. The key ID associated with the service account key Vault created will be listed.
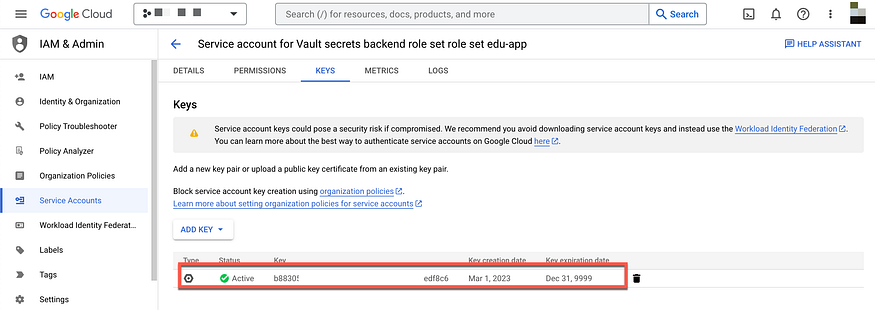
This key is required by the Vault node when it authenticates with GCP.
Service Account Key
An application can read the Vault roleset to generate a unique service account key.
- Read the
edu-approleset to generate a new key.
$ vault read gcp/roleset/edu-app-key/key

Key                 Value
---                 -----
lease_id            gcp/roleset/edu-app-key/key/ra4SvjyYlp9udTrkCBnsK3Ky.RfmoS
lease_duration      2m
lease_renewable     true
key_algorithm       KEY_ALG_RSA_2048
key_type            TYPE_GOOGLE_CREDENTIALS_FILE
private_key_data    ewogICJ0eXBlIjogInNlcnZpY2VfY...snip...dmF0ZV9rZXlfaWQiOiAiMWIyNzViOG
The lease_duration is set to 2m because the TTL defined in the secrets engine configuration was set to 2m.
They private_key_data value is a base64 encoded blob that has a properly formatted JSON file which the service can use to authenticate with GCP.
2. Generate a new key and base64 decode the private_key_data field to reveal the JSON formatted credential file.
$vault read --field private_key_data gcp/roleset/edu-app-key/key | base64 --decode
3. Return to the GCP console.
4. Expand the hamburger menu and navigate to IAM & Admin >> Service Accounts.
5. A service account has been created in GCP based on the Vault role name edu-app-key.
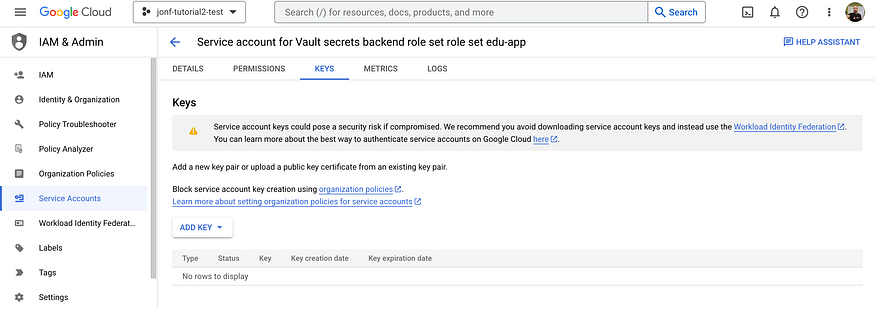
6. Click the vaultedu-app-key123456789@… service account and click the KEYS tab.
7. The key ID associated with the service account key you created will be listed.

8. Wait two minutes and refresh the page. They key ID is no longer listed because the TTL was set to two minutes and the key was revoked.
Conclusion
Vault is a great tool and it really has little competition in doing what it does better. If your organisation requires a lot of the features it provides like dynamic secrets, encryption or generating certificates on the fly, then Vault is a great tool and wholeheartedly recommend it.